Mastering Amazon Listing Optimization: A Comprehensive Guide for Sellers
Hey there, fellow sellers! If you’re part of the ever-expanding world of e-commerce, chances are you’re familiar with the e-commerce giant, Amazon. With millions of products competing for attention on this platform, standing out is not a child’s play. That’s where Amazon listing optimization comes into play, and in this blog, you’ll learn how to optimize your product listing to rank higher among the competition.
Table of Contents:
- What is Amazon Listing Optimization?
- Why is Amazon Listing Optimization Important?
- How to Optimize Your Amazon Listings in 8 Easy Steps
- Common Mistakes to Avoid while Optimizing Amazon Product Listing
- How Does Product Listing Optimization Impact the Customer Decision Journey?
- Top 3 Amazon Listing Optimization Tools
Whether you’re a seasoned seller or just starting your Amazon seller’s journey; this guide will help you optimize your product listings. But before you know…
What is Amazon Listing Optimization?
“Amazon listing optimization refers to the Amazon SEO (Search Engine Optimization) process of enhancing product listings on the Amazon platform to maximize visibility, attract potential customers, and ultimately drive sales. It involves fine-tuning various elements within a product listing, such as product titles, bullet points, product descriptions, etc.”
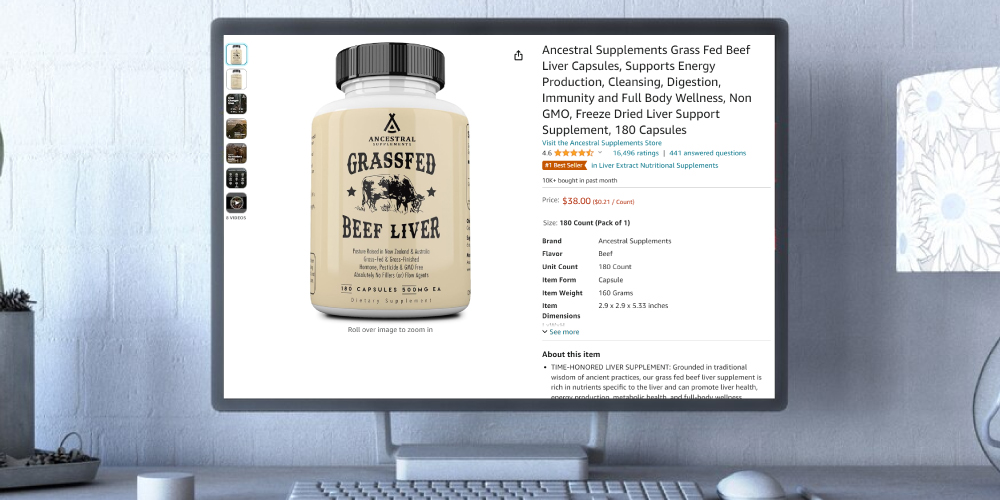
In the world of selling on Amazon, your product listing is like your best salesperson. It’s the online space where you showcase your product to potential customers. Think of it as your virtual shop window, complete with images, descriptions, and shoppers feedback who’ve already tried your product.
Now, when we talk about Amazon product listing optimization, we’re basically talking about making your virtual shop window as attractive as possible. It’s like giving your salesperson a superpower. This process is important because it helps you get more people to visit your listing and, most importantly, convert those visitors into actual customers.
Therefore to succeed with product listing optimization you’ve got to pay attention to every little detail. From your product’s title and description to the reviews (having lots of them is a big plus). You also need to have a smart advertising strategy and ensure that your product is easily found by using the right keywords and other techniques. So, Amazon listing optimization is all about fine-tuning your online presentation to maximize your success as a seller.
Why is Amazon Listing Optimization Important?
Amazon product listing optimization is critically important for several reasons in the context of e-commerce on the Amazon platform:
Boosts Product Visibility
Amazon listing optimization improves how your product appears on the platform, making it more visible to potential buyers. By enhancing your product listing, it increases the chances of people finding and choosing your item when they search on Amazon. It’s like giving your product a better spotlight to attract more attention and potential customers.
Higher Click-Through Rate (CTR)
Amazon product listing optimization helps in achieving a higher click-through rate by optimizing titles, images, and descriptions. A well-optimized listing not only attracts shopper’s attention but also compels potential buyers to click, increasing the chances of conversion and sales.
Builds Customer Trust
A well-optimized listing provides clear, detailed information and showcases your product’s best features with high-quality images. This transparency builds trust with potential buyers who know exactly what they’re getting.
Improves Conversion Rates
It makes your product easier to find and understand. When your listing has the right keywords and clear info, more people see it, trust it, and buy it. This boosts your conversion rates and helps your business do better on Amazon.
Competitive Edge
Because it raises search rankings, draws in potential customers, and increases product visibility, Amazon listing optimization is vital for competition. That is to say, in the highly competitive online market, discoverability is increased by well-optimized listings that include relevant search terms, language, and high-quality product images. Hence, increases the likelihood of outperforming rivals and generating sales.
Enhances Customer Experience
Shoppers appreciate a seamless journey from search to purchase; And a well-optimized product listing ensures that customers get the information they need, resulting in a positive buying experience.
How to Optimize Your Amazon Listings in 8 Easy Steps
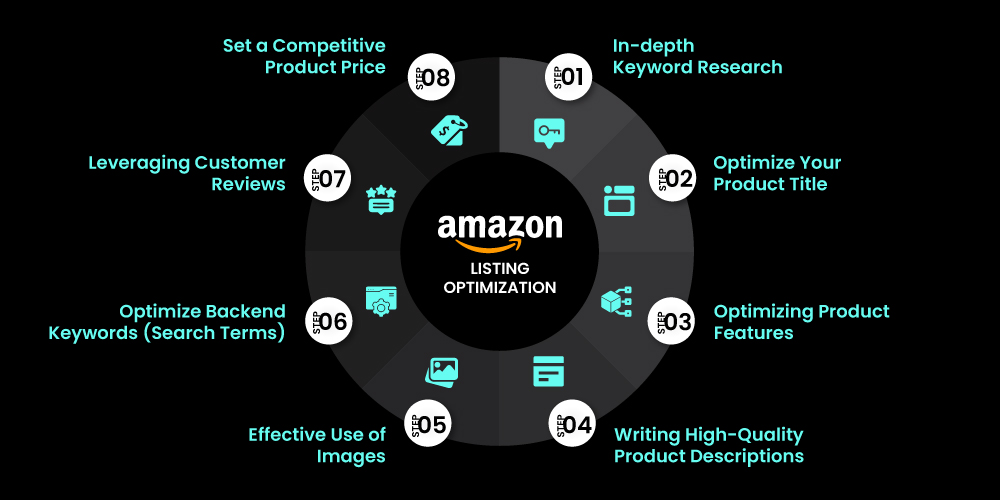
These Amazon listing optimization steps will help you enhance your product visibility and performance on the platform. So, let’s get started with the process!
Step 1: In-depth Keyword Research
First Method: Amazon Search
To find the right keywords for your Amazon listing optimization, try these methods:
- Insert a primary keyword related to your product, for example, “cotton t-shirt,” into the Amazon search bar.
- The search bar will then display a list of suggested or auto-completed keywords that other shoppers commonly use when looking for similar products.

- Pay attention to the auto-suggested keywords that appear as you type your primary keyword. These suggestions can give you ideas for other ranking keywords people often use, helping improve your product visibility.
- These suggestions can serve as a foundation for your keyword research, as they represent terms that potential customers are actively using.
- Look for longer, more specific keyword phrases that capture the unique features or benefits of your product. For instance, instead of just “cotton t-shirt,” consider variations like “cotton t-shirt for men” or “soft and breathable cotton shirt.”
Second Method: Utilize Paid Keyword Research Tools
- Consider using third-party keyword research tools specifically designed for Amazon, such as Helium 10 or Jungle Scout.
- These tools can provide additional insights into keyword search volumes, competition levels, and potential keywords that might not be immediately apparent.
Tip for sellers: If you want to do thorough research, I recommend using Helium 10. It’s my favorite tool for finding the best keywords and optimizing my clients’ listings. It’s a paid tool.
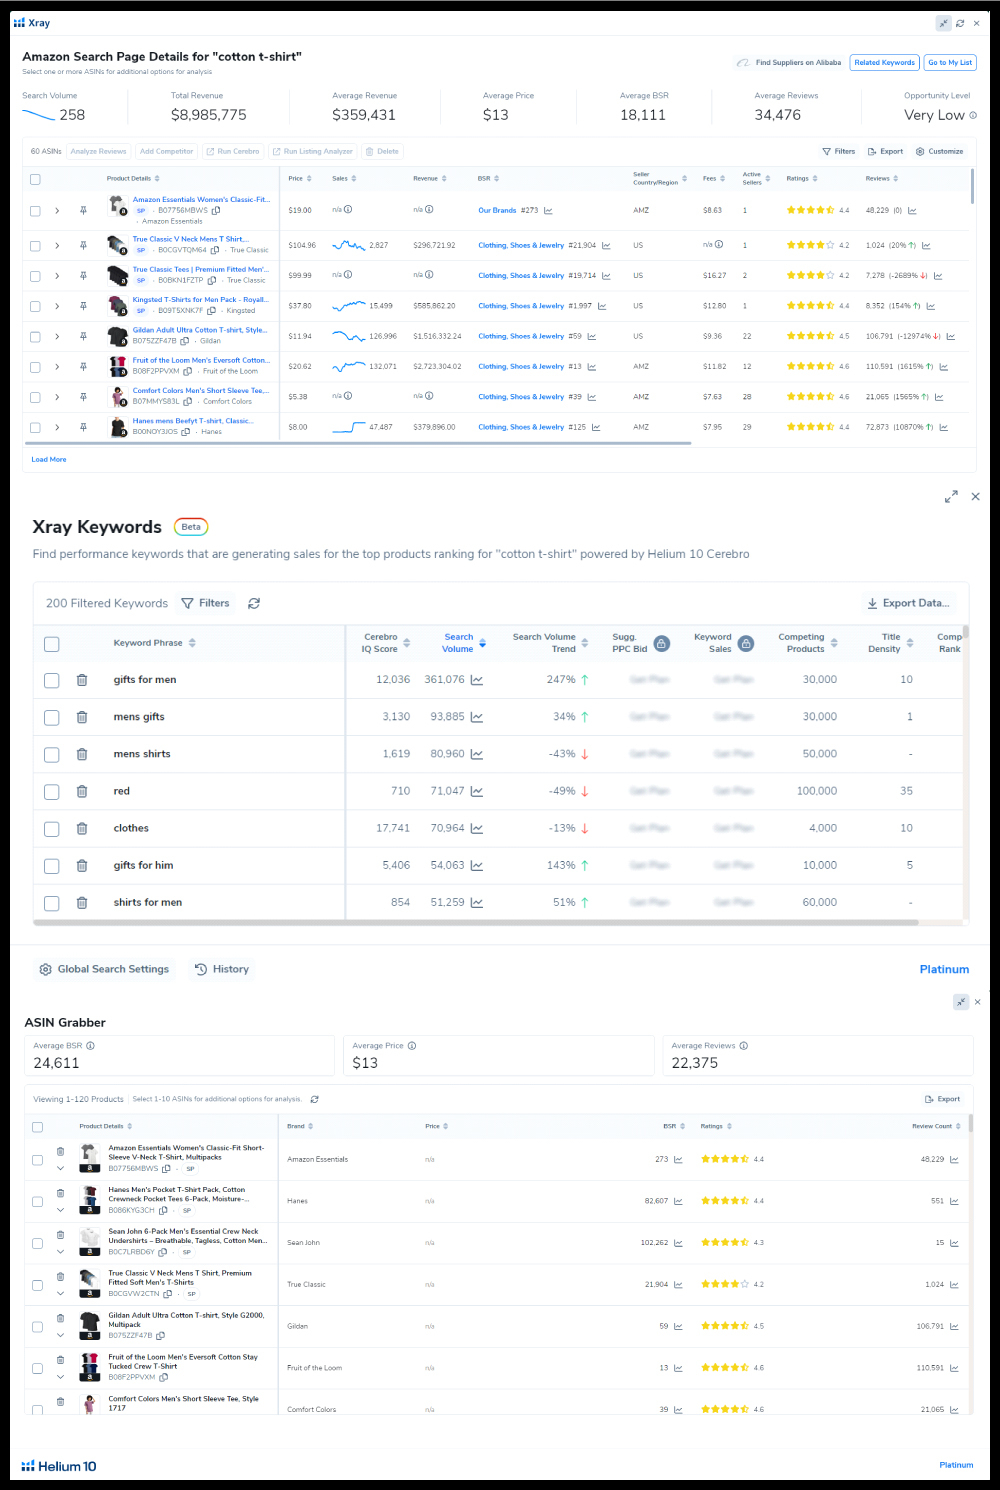
Check Out This Helium 10 In-Depth Keyword Research Trick
- Install the Helium 10 extension in your system browser and activate it.
- You can choose among Amazon Product Research (to get product insights), Xray Keywords (to get top-ranking keywords), or ASIN Grabber (to grab top-most products ASINs).
-
- The Helium 10 extension for Amazon can help by providing real-time insights and analytics on the Amazon Search Engine Results Pages (SERPs).
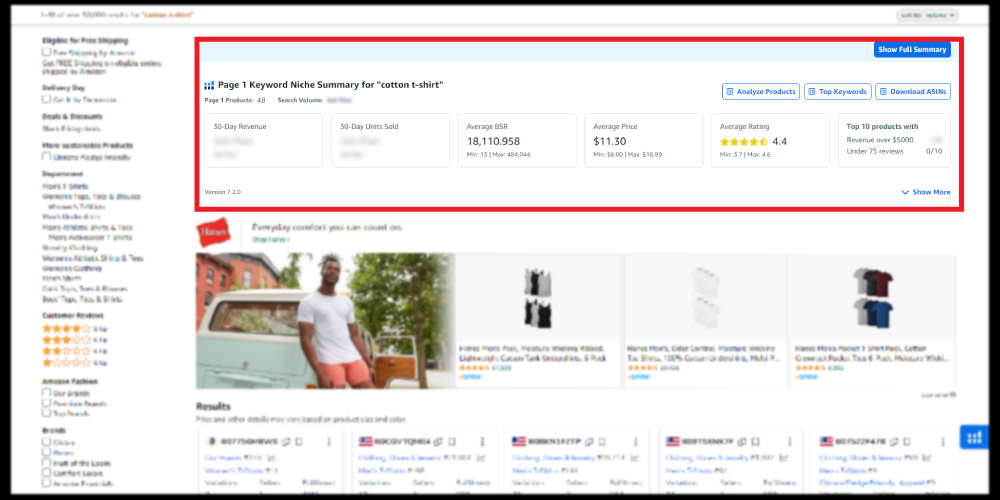
- Determine the top 10 competitors with the help of product research options.
- Analyze their product listings. Identify the keywords they are using in their titles, bullet points, and product descriptions.
- Take note of high-performing keywords that appear consistently across successful listings in your product category.
Read More About: Helium 10’s Amazon Keyword Research Tools
Third Method: Take Advantage of Customer Reviews
If you want to find certain words in Amazon customer reviews, here’s how:
- Go to Amazon and find the product page you want.
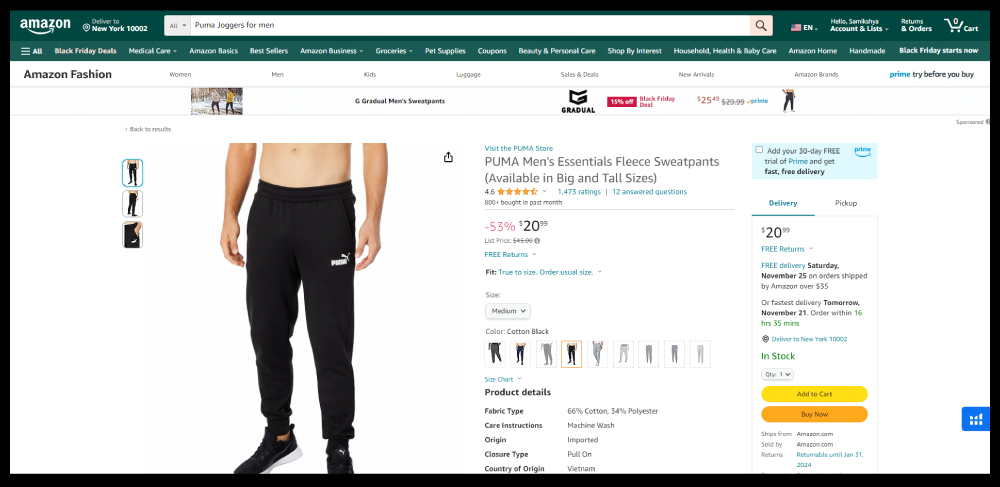
- Scroll down to “Customers also viewed” and click “See more reviews.”
- On the review page, there’s a search bar at the top. Type in your keywords here.
- Or, on the left side, use advanced options to filter reviews by star rating, date, or keywords.
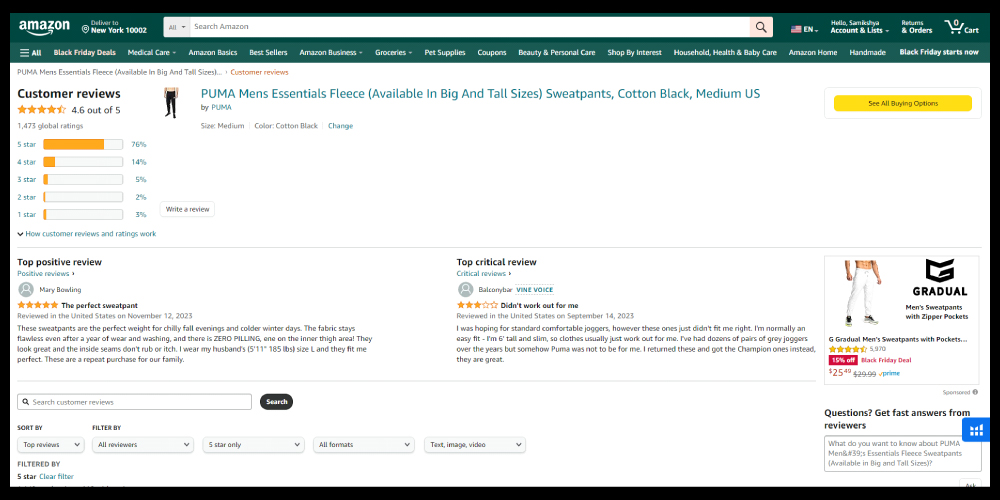
- After applying filters, you’ll see matching reviews. Read them to get the info you need.
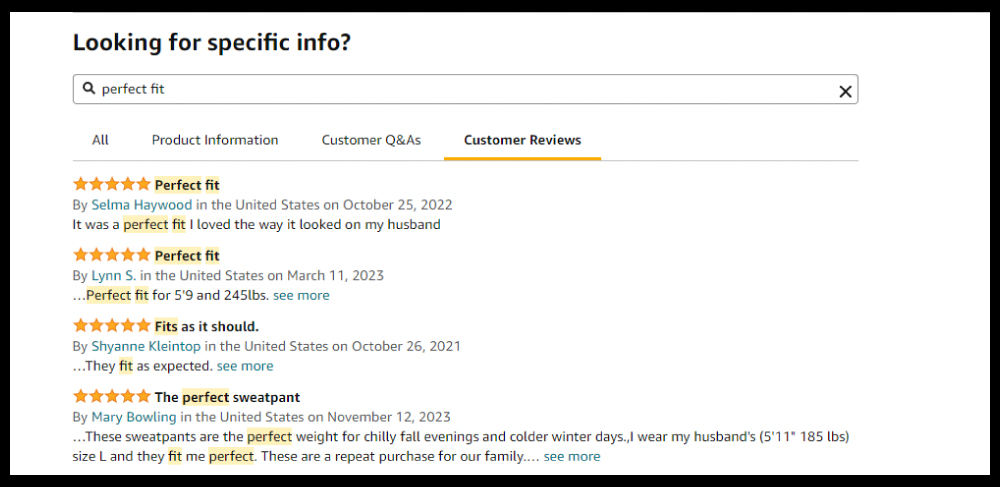
- Remember, not all products have lots of reviews, and they might not always have the words you’re looking for.
Step 2: Optimize Your Product Title
The Amazon product title is the first thing Amazon’s algorithm looks at when people search, and it’s also the first thing customers see.
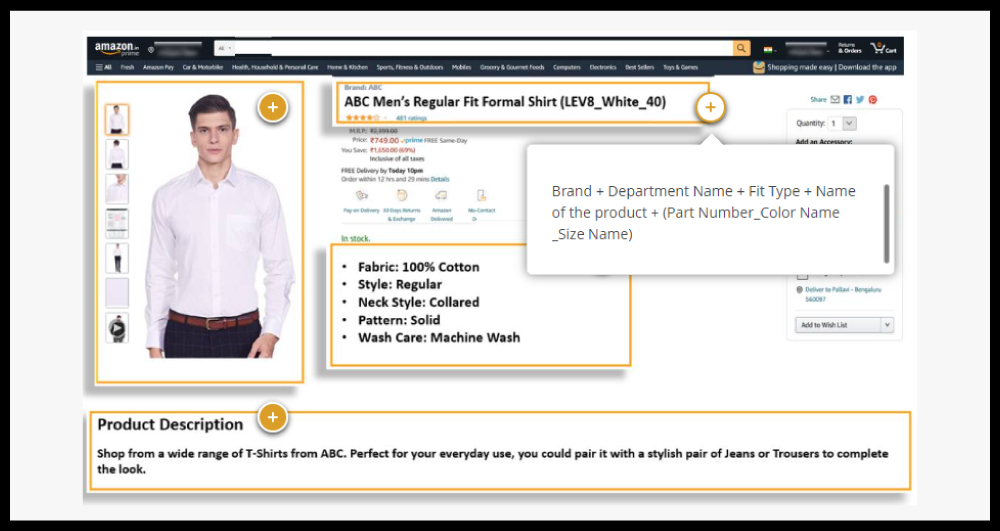
Here are some tips to enhance the clickability of your title:
- Each product category has a specific way titles are usually written; make sure to use that structure.
- Follow the guidelines for titles that are commonly used in that category. know about Amazon’s different product lines/ categories:
- Style guidelines for hardline products
- Style guidelines for softline products
- Style guidelines for other hardline products
- Style guidelines for heavy and bulky products
- Style guidelines for media products
- Style guidelines for consumable products
- Notice how long the titles are and the structure they use for each specific category.
- Your product title should be at least 80 characters. To give customers a better experience, aim for a character count between 100 and 200.
- Start your listing title with the product’s brand name. This establishes brand recognition for potential customers.
- Make sure your product title is the same as what’s mentioned in the actual product images.
- Avoid using all capital letters. Instead, capitalize the first letter of each word (excluding prepositions, conjunctions, or articles).
- Add at least three high-search volume keywords defining your product niche.
- Opt for numerals like “2” instead of spelling out numbers.
- Don’t use non-language ASCII characters such as Æ, ©, or ®. Stick to characters like hyphens, forward slashes, commas, ampersands, and periods.
- Don’t use promotional words like “best,” “amazing,” “top-rated,” “exclusive,” or “highest quality” that imply subjective claims or exaggerations.
- Use separators “|” “-” or the “,” in your title to help shoppers read it easily.
- If applicable, include measurement units like “cm,” “oz,” “in,” and “kg” in your title. It keeps things clear and short.
Step 3: Optimizing Product Features
Every product has its special features that buyers should know, and Amazon lets you highlight them in five bullet points. Consider the following guidelines for crafting impactful bullet points:
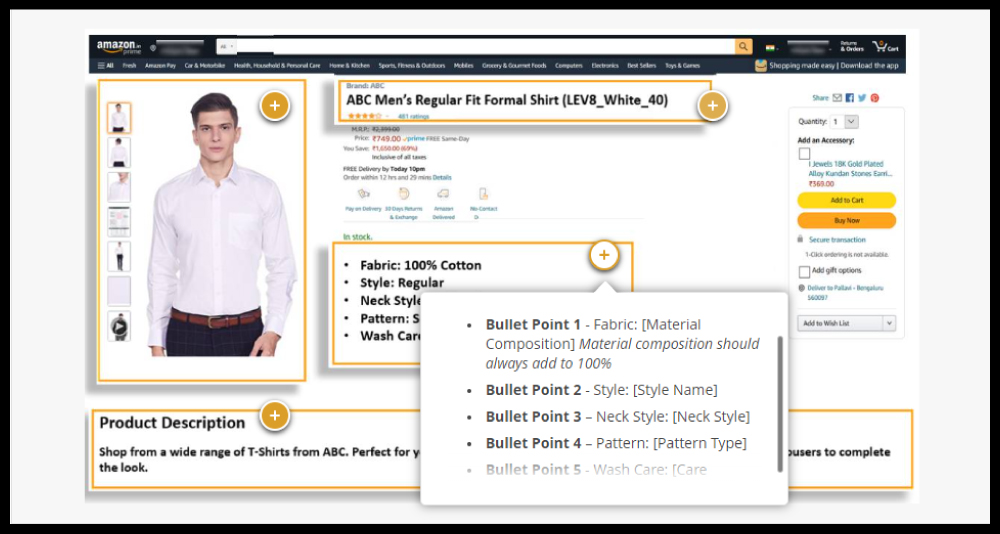
Consider the following guidelines for crafting impactful bullet points:
- Include at least five bullet points per product.
- Keep the length under 1,000 characters for all five bullets, ensuring readability.
- Highlight key features, such as dimensions, built material, ideal conditions, skill level, contents, or country of origin. Stick to these style guidelines based on the specific product category for highlighting relevant features.
- Style guidelines for hardline products
- Style guidelines for softline products
- Style guidelines for other hardline products
- Style guidelines for heavy and bulky products
- Style guidelines for media products
- Style guidelines for consumable products
- As a seller, when optimizing a batch of similar products, make sure the first bullet point heading for each variation is consistent. It’s important to maintain this consistency across all your product listings on Amazon.
- In each bullet point, include three or more popular keywords with high search volume. You can also use keywords as the headers for your bullet points.
- Use the same keywords in your bullet points that are in your title. This may help your product listing rank higher compared to competitors.
- Start each bullet point with a capital letter. Write short sentences without periods at the end.
- Don’t use any promotional and pricing information in bullet points.
Seller Pro Tip: Amazon doesn’t allow promotional and pricing info in bullet points to help customers compare products and make smart buying choices. This ensures a fair marketplace for all sellers and prevents unfair advantages.
- Always follow all product detail page rules and policies.
Step 4: Writing High-Quality Product Descriptions
Crafting high-quality product descriptions is key to helping customers discover, evaluate, and ultimately purchase your products. Here are some valuable tips for creating compelling product descriptions:
- On Amazon, you have 2,000 characters to tell people about your product. Share details about what it does and why it’s great.
- Explain how customers can benefit and what makes it unique.
- Make sure to include your brand name in the description.
- Be clear about how many of the products they get when they make a purchase. This is especially important if you’re selling sets or bundles.
- Tell customers what your product is made of. Whether it’s fabric, ingredients, or something else, be clear.
- For things like shoes or clothing, include the size.
- If you’re selling furniture, backpacks, etc., let people know the dimensions so they understand how spacious your product is.
- Let people know about the colors your product comes in. Also, share info about the packaging – whether it’s a fancy box or eco-friendly.
- Use simple HTML to separate paragraphs and make important info bold.
- Add keywords that aren’t in your title or backend keyword section.
- Don’t include your seller name, website URL, or company details.
- Avoid using words like “sale” or “free shipping.”
Use A+ Content (Enhanced Brand Content)
But first Know, What is Amazon A+ Content (Enhanced Brand Content).
Amazon A+ Content, formerly known as Enhanced Brand Content (EBC), is a feature offered to brand-registered sellers on Amazon. It provides an enhanced way to showcase product details by allowing sellers to create visually appealing and informative content on their product detail pages. Moreover, A+ Content enables sellers to go beyond the standard product descriptions and bullet points, offering engaging and branded shopping experiences for customers.
Utilizing A+ Content empowers brands to showcase product features in innovative ways. By incorporating a unique brand story, enhanced images, and strategically placed text, businesses can potentially experience higher conversion rates, increased traffic, and boosted sales when leveraging this feature effectively.
Here’s an example of well-crafted A+ content:

Seller Pro Tip: While the brand is often mentioned in the title, description, and bullet points, make sure to include it in the designated brand field. This enhances searchability and ensures that customers who filter by brand can easily locate your listing.
Step 5: Effective Use of Images
Well-optimized images not only showcase key features but also provide a visual narrative that can significantly impact a customer’s choice among search results.
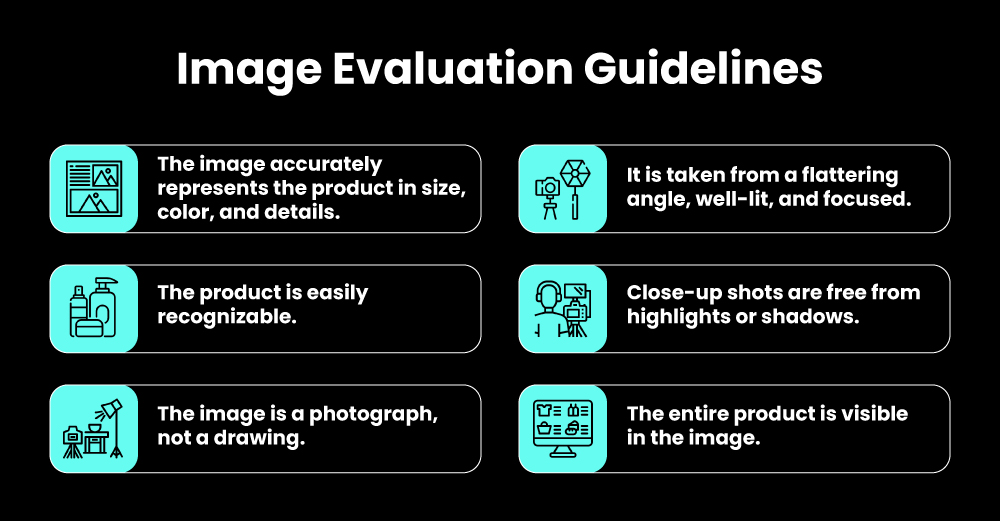
Consider the following tips to optimize your product images:
- Add pictures that show your product from different sides. This helps customers compare features. Show how the product is used so customers can picture it in real life, boosting the chances of a purchase.
- Use at least six images and think about adding a video. This makes your product listing more complete and appealing.
- Make sure your images are clear, helpful, and look good. Good-quality pictures make shopping a better experience.
- Put your product on a white background, taking up at least 85% of the picture. This gives it a neat and professional look.
- Use picture dimensions of 500 x 500 or 1000 x 1000 pixels for better quality.
- Pick backgrounds that are simple and don’t take attention away from the product.
- Include lots of different images if you can. Some categories allow for swatch images and different views.
- Follow the rules for images on the site and make sure your pictures meet all the technical requirements to avoid any problems.
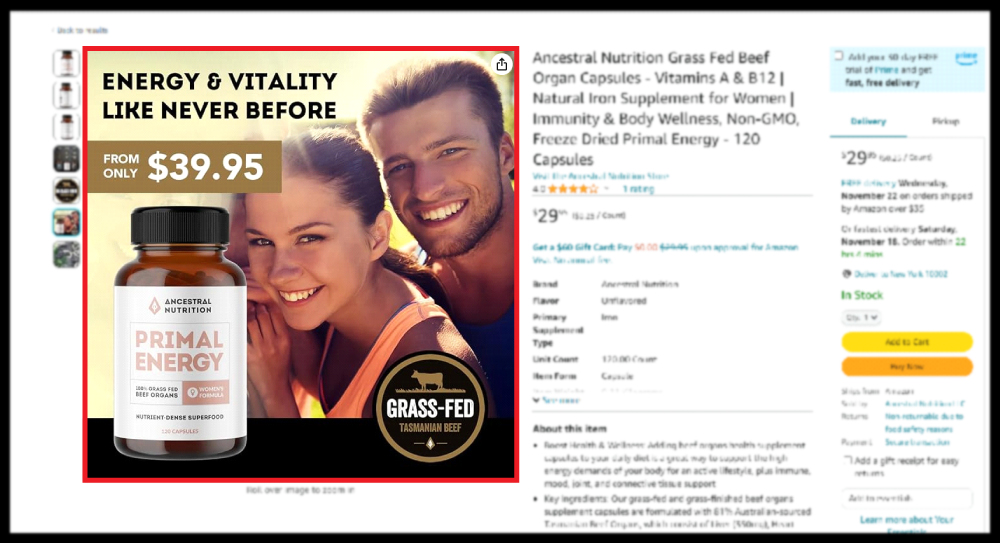
For example, the product image below adheres to all the mentioned guidelines effectively.
Seller Pro Tip: Optimize Images with the Amazon Seller App
Utilize the Amazon Seller App to optimize your photos easily. The app provides features for automatic and manual adjustment of image exposure, brightness, cropping, and background whitening.
Step 6: Optimize Backend Keywords (Search Terms)
Search Terms, situated in the backend of a product listing, serve as hidden keywords that enhance the discoverability of products on Amazon. While not visible to shoppers, they play a crucial role in ensuring that relevant keywords are indexed by Amazon’s search algorithms.
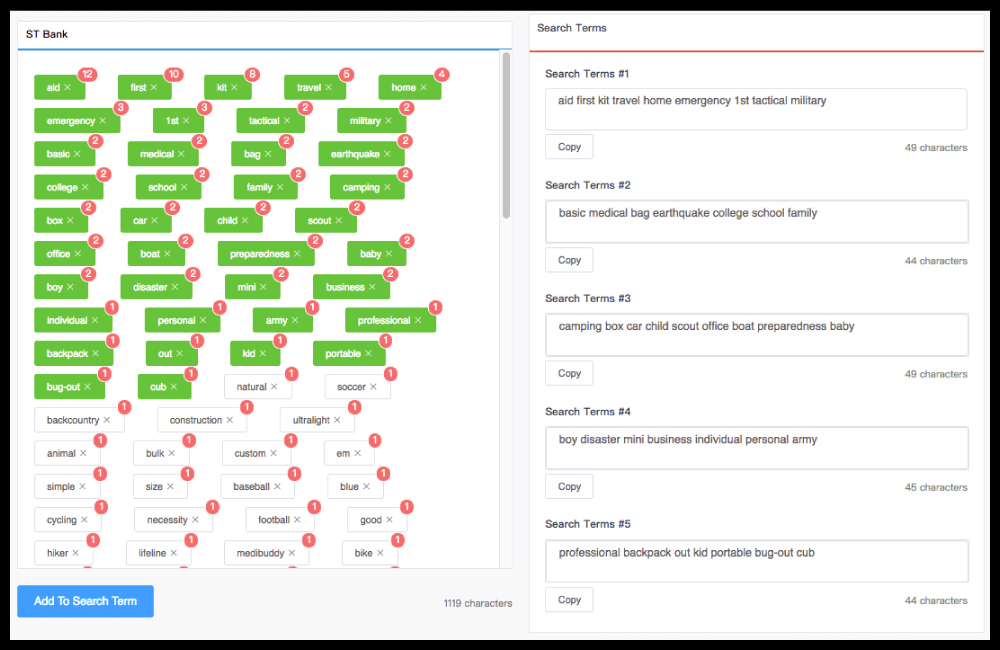
Here are some tips for optimizing your Search Terms effectively:
- Use simple words that broadly describe your product in your Search Terms. This makes sure you cover a lot of different search queries.
- Mix up your Search Terms by adding synonyms, abbreviations, and other names for your product. This makes more search queries lead to your product.
- Keep your Search Terms short, under the 250-character limit. Don’t use extra characters, and remember spaces and punctuation don’t count.
- When you write phrases, put them in a logical order based on how people usually search. This helps your product show up better in searches.
- Include different ways words are spelled, but don’t add misspellings on purpose.
- Make your product easy to find by including abbreviations and other names people might use when searching.
- Use only lowercase letters in your Search Terms for simplicity.
- Don’t use hyphens, colons, or special characters. Just use spaces between words.
- Don’t repeat words in the Search Terms. This makes the content more focused and efficient.
- Leave out common words like “a,” “an,” “and,” “by,” “for,” “of,” “the,” “with,” etc. They don’t help much in searches.
- Stick to either singular or plural forms of words. Using both isn’t necessary.
Seller Pro Tip: By following these optimization tips, you can create Search Terms that enhance the visibility of your products and improve their chances of appearing in relevant search results on Amazon.
Step 7: Leveraging Customer Reviews
Product reviews play a crucial role in Amazon listing optimization and also in determining a product’s overall rating. Achieving a high rating isn’t just about delivering quality products; it also involves prioritizing excellent customer service and addressing concerns promptly.
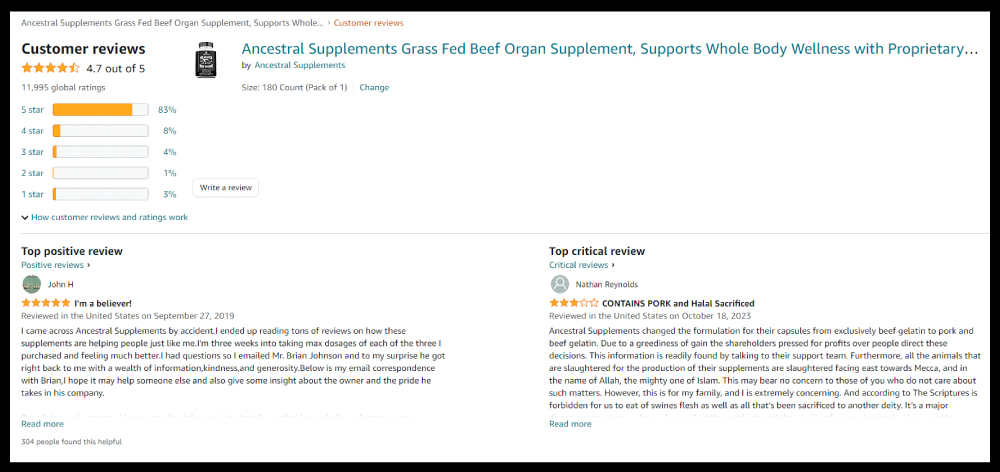
The above-listed product currently boasts an impressive 4.7 out of 5 stars, a commendable score, yet there’s always room for improvement.
For those already enjoying a rating in the 4-5 star range, it indicates strong product performance. However, if your product is struggling with limited ratings, here are actionable steps to enhance your standing:
- Look at bad or negative reviews to find out what problems or complaints customers often have.
- Once you see a pattern, come up with solutions to fix these problems before they become negative reviews.
- Use automated email campaigns to get feedback. This can sometimes solve problems before they turn into bad reviews.
- Ask happy customers to leave reviews to balance out any occasional negative ones.
- Respond quickly to customer questions and complaints. Showing you care about making customers happy can make a positive difference in individual cases and overall ratings.
Seller Pro Tip: Remember, achieving a high rating isn’t just about avoiding negative reviews but actively working to enhance customer satisfaction. By addressing issues, seeking feedback, and maintaining a responsive customer service approach, you can continually improve your product’s overall rating and build a positive reputation in the marketplace.
Step 8: Set a Competitive Product Price
The price of your products really affects how many people buy them and how much you sell. To set a good price, check out what your competition is doing and change your prices to stand out in your market.
Here’s a cool trick: Automate Pricing helps you automatically change the prices of the items you’re selling. It does this in response to things like changes in the Featured Offer price. This way, you don’t have to go back and change each item’s price by hand every time you need to make a change. The pricing of your products holds significant sway over conversion rates and overall sales growth. To establish competitive pricing, delve into thorough research on your competitors and make necessary adjustments to carve out a compelling price point within your niche.
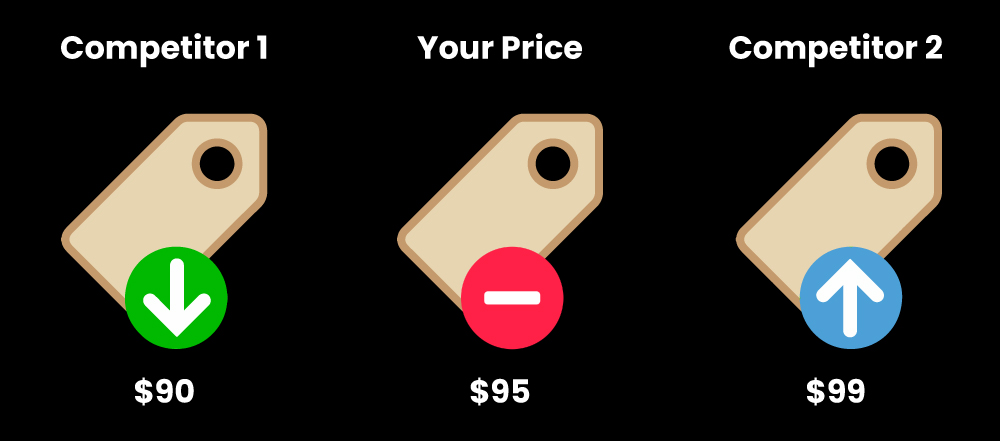
Explore these effective strategies to optimize your product prices:
- When you want to compete on prices, use the Compare Prices Off Amazon feature. This helps you match with competitive prices, increasing your chances of getting featured in the Buy Box, which is great for sales.
- Try testing different prices using A/B testing to see what works best for selling your products. Use Manage Your Experiments to play around with prices and figure out the best strategy.
- Keep an eye on how your product is ranked with the Brand Dashboard. Manage your reviews, because good reviews help you show up better in searches. Follow good practices to keep positive feedback and ratings.
- Make the most of Amazon Brand Analytics for smart decision-making. Get info on what people are searching for, see how ads are doing, and understand your customers better with helpful reports.
By implementing these strategies, you not only optimize your product prices for competitiveness but also enhance your overall strategy for increased sales and improved visibility on the Amazon platform.
Now that you’ve learned the ropes of Amazon listing optimization, let’s delve into the common mistakes you should avoid during the optimization process.
Common Mistakes to Avoid While Amazon Listing Optimization
In the fast-paced world of e-commerce, a well-optimized Amazon product listing is key to standing out and attracting potential customers. However, it’s crucial to be aware of common pitfalls that can hinder your optimization efforts. Here’s a guide on what to avoid to ensure your product shines on the virtual shelves of Amazon:
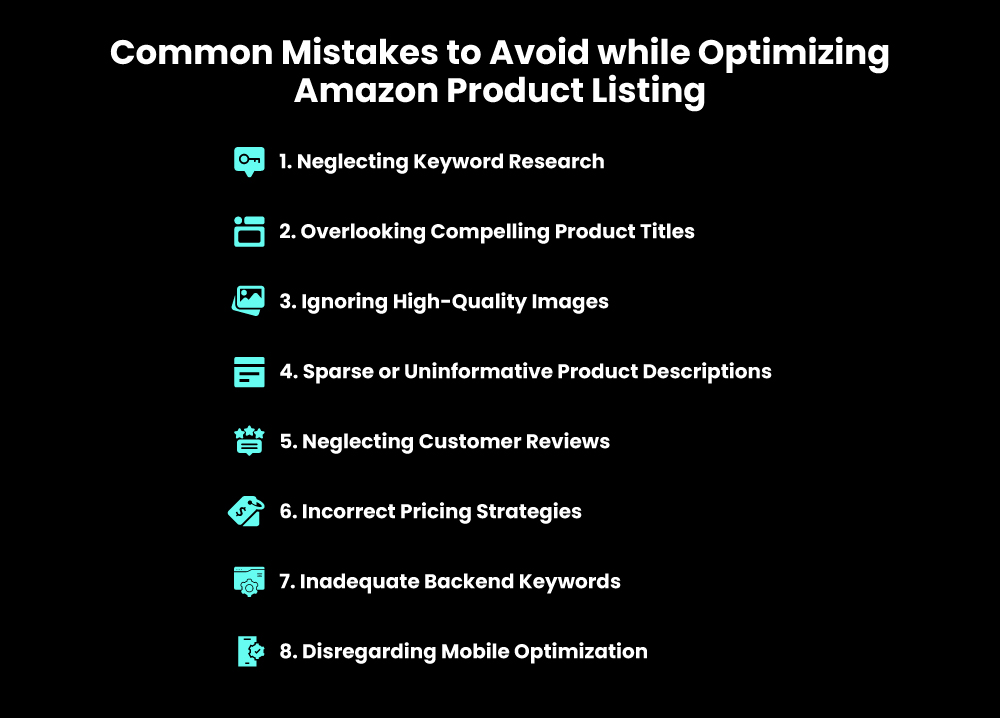
- Ensure thorough keyword research to prevent your product from getting lost in the vast Amazon marketplace.
- Craft compelling and clear product titles that effectively convey the value of your item.
- Recognize the significance of visually appealing product images; don’t underestimate their impact on attracting potential customers.
- Avoid providing insufficient information in your product descriptions; instead, aim for detailed and informative content.
- Acknowledge the influence of customer reviews on your product’s reputation; actively encourage positive reviews and address negative ones professionally.
- When setting prices, carefully consider the competitive landscape to ensure your pricing strategy aligns with market trends.
- Pay attention to the backend search terms section in your product listing; utilize it to include additional relevant keywords for improved discoverability.
- Don’t overlook the growing number of shoppers using mobile devices; optimize your product listing to provide a seamless experience for mobile users.
By steering clear of these common mistakes, you can enhance the visibility and appeal of your product on Amazon, therefore boosting your chances of success in the competitive online marketplace.
How Does Amazon Listing Optimization Impact the Customer Decision Journey?
Making your Amazon listing better is necessary. When you take time to improve it, it really affects how customers decide to buy your stuff.
First off, a well-fixed Amazon listing makes your product easier to find. When people search for something, a good listing makes your product show up higher. This means more people see it and might click on it.
Also, a good listing gives customers all the info they need to decide. A clear title, detailed bullet points, and a nice description make customers trust your product. When they trust it, they’re more likely to buy. Targeting relevant keywords helps people who are looking for products like yours find your stuff easily.
So, fixing up your Amazon listing is a big deal but it makes your product easier to see, gives customers the details they want, and matches what people are searching for. This helps you sell more and get loyal customers.
Top 3 Amazon Listing Optimization Tools
As a seller navigating the vast landscape of Amazon, optimizing your listings is crucial for standing out in the crowd. Fortunately, there are several tools designed to streamline and supercharge your Amazon listing optimization efforts. One standout tool that many sellers swear by is Helium 10.
Helium 10 is an all-in-one suite of tools tailored for Amazon sellers. It covers everything from keyword research and listing optimization to competitor analysis. With features like Magnet for keyword research and Cerebro for competitor intelligence, Helium 10 empowers sellers to make data-driven decisions, ensuring their products are not just seen, but seen by the right audience.
Another essential tool in the arsenal of successful Amazon sellers is Jungle Scout. Known for its user-friendly interface, Jungle Scout aids sellers in finding profitable niches, understanding market trends, and optimizing listings for maximum visibility. The product tracker feature allows sellers to monitor the performance of their products and adjust strategies accordingly.
For those looking to fine-tune their Amazon PPC campaigns and boost ad performance, Perpetua is a go-to tool. It provides insightful analytics, allowing sellers to optimize their advertising spend effectively. With a user-friendly interface and a range of features, Sellics empowers sellers to navigate the complexities of Amazon advertising with ease.
These Amazon Listing Optimization tools, especially Helium 10, Jungle Scout, and Perpetua, serve as indispensable companions for sellers striving to optimize their Amazon listings. By leveraging the capabilities of these tools, sellers can refine their strategies, stay ahead of the competition, and ultimately enhance their overall success on the platform.
Putting It All Together
Building a strong house requires a solid foundation, and the same goes for your business. In the case of your Amazon store, the foundation is your product listing optimization. Since every sale depends on your listing, it’s crucial to optimize it properly.
If your product listings are of poor quality, potential buyers will quickly lose interest. To avoid this, you can follow the above process for conducting an Amazon listing optimization audit. By doing this, you can stop directing valuable traffic to subpar product listings.
By optimizing your product pages using the best practices outlined in this article, you have the potential to significantly enhance your keyword rankings and conversion rates. This, in turn, can lead to more organic traffic and increased sales. Simply log in to your Seller Central account and start implementing these optimization strategies for better results.
